CSSだけで画像をトリミングする3つの方法
cssだけで画像を変に引き延ばさずにトリミングする方法です。
1 画像をbackgroundとして使うタイプ
imgとして置かずに、divなどのbackgroundとして使うタイプです。background-sizeをcoverにして、背景領域を完全におおう最小サイズで出しています。
HTML
<div class="box box1">
  <div class="img_ttl">画像をbackhroundとして使うタイプ</div>
  <div class="img_cover"> </div>
</div>
CSS
/* 画像をbackhroundとして使うタイプ */

.box1 .img_cover {
	background: url(https://style01.net/wp-content/uploads/2018/02/180201_02-e1517458727881.jpg) no-repeat center center;
	background-size: cover;
	height: 500px;
	width: 300px;
}
2 positionを使うタイプ
img要素を包んでいる要素(ここでは.box2 .img_cover)にposition:relativeを、imgにposition:absoluteをそれぞれ付けて、imgを.box2 .img_coverを基準にした絶対位置にしています。img要素をtopとleftで50%ずつ移動させ、要素の表示位置をtransform:translateを-50%で調整して画像を真ん中へ持って来ます。
HTML
<div class="box box2">
  <div class="img_ttl">positionを使うタイプ</div>
  <div class="img_cover"> <img src="https://style01.net/wp-content/uploads/2018/02/180201_02-e1517458727881.jpg" alt=""> </div>
</div>
CSS
/* positionを使うタイプ */

.box2 .img_cover {
	height: 500px;
	overflow: hidden;
	position: relative;
	width: 300px;
}

.box2 img {
	left: 50%;
	top: 50%;
	-webkit-transform: translate(-50%, -50%);
	-ms-transform: translate(-50%, -50%);
	transform: translate(-50%, -50%);
	position: absolute;
}
3 object-fitを使うタイプ
object-fitプロパティを使うやり方。1行書くだけで実装できます。とても楽でいいのですが、IE勢はお察しの通りなので、対策が必要です。
HTML
<div class="box box3">
  <div class="img_ttl">object-fitを使うタイプ</div>
  <div class="img_cover"> <img src="https://style01.net/wp-content/uploads/2018/02/180201_02-e1517458727881.jpg" alt=""> </div>
</div>
CSS
/* object-fitを使うタイプ */
.box3 img {
	height: 500px;
	width: 300px;
	object-fit: cover;
	object-position: center center;
}
Can I use object-fit?
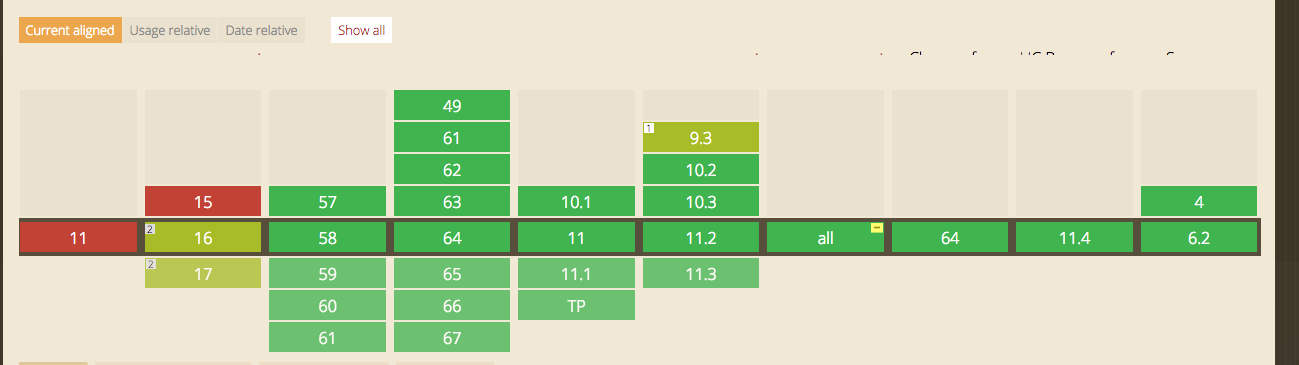
object-fitをIEに効かせるjsがあります↓
object-fit-images ※GitHubページ
object-fit-imagesをGitHubからDLしてきたら、jsなどを読み込み、下記をcssに追記。
font-family: 'object-fit: cover; object-position: bottom;'これでIEにもobject-fitが効くようになります。
IEはいつ滅びるんですかね?